- The Option Premium
- Posts
- Iron Condor Strategy Explained: Defined-Risk Neutral Trading
Iron Condor Strategy Explained: Defined-Risk Neutral Trading
Learn how iron condors work with a complete example, the 4 ideal conditions, strike selection by delta, trade management rules, and how to size iron condors in a premium-selling portfolio.

Andrew Crowder
March 15, 2026
Iron Condor Strategy Explained: Defined-Risk Neutral Trading
Most options strategies require you to have an opinion. Bullish or bearish. Up or down. Pick a direction and hope you're right. The iron condor flips that script entirely. Instead of predicting where a stock is going, you define a range where you believe the stock won't go, collect premium for that belief, and profit when the stock stays inside the boundaries you've drawn.
It's a strategy built for the most common market condition that exists: stocks doing not much of anything. And after 23+ years of selling premium, I can tell you that stocks spend far more time chopping sideways than they do making dramatic moves. The iron condor lets you monetize that reality.
What Is an Iron Condor?
An iron condor is a four-leg options strategy that combines a bull put spread below the current stock price with a bear call spread above it. You're selling premium on both sides of the market, collecting income from the belief that the stock will stay within a defined range through expiration.
Here's the structure broken down:
The bull put spread (lower side). Sell an OTM put and buy a further OTM put at a lower strike. This is your downside protection zone. You profit as long as the stock stays above your short put strike.
The bear call spread (upper side). Sell an OTM call and buy a further OTM call at a higher strike. This is your upside protection zone. You profit as long as the stock stays below your short call strike.
Combined, the four legs create a profit zone between your two short strikes. The stock can move up, down, or sideways within that zone and you keep the premium collected.
The "iron" in iron condor refers to the fact that you have both puts and calls in the trade, creating a defined-risk structure on both sides. Your maximum loss is known before you enter the trade. Your maximum profit is the total premium collected from both spreads. There are no surprises.
How an Iron Condor Works: Step by Step
Let's walk through an example. A stock is trading at $200, and you expect it to stay relatively flat over the next 30 days.
You open the following four-leg position:
Sell the $190 put (short put). Buy the $185 put (long put). Sell the $210 call (short call). Buy the $215 call (long call).
Net credit collected: $2.00 ($200 per iron condor).
Now here's what the numbers look like.
Profit zone: $190 to $210. As long as the stock stays between your two short strikes at expiration, all four options expire worthless and you keep the full $200.
Maximum profit: $200 (the net credit). This is what you earn if the stock finishes anywhere between $190 and $210.
Maximum loss: $300 per side. The width of each spread ($5) minus the credit collected ($2) equals $3 per share, or $300 per contract. This is your worst case on either side.
Breakeven points: $188 on the downside ($190 short put minus $2 credit) and $212 on the upside ($210 short call plus $2 credit).
Notice the key feature: you know your max profit, max loss, and breakeven points before you place the trade. That's the power of defined risk.
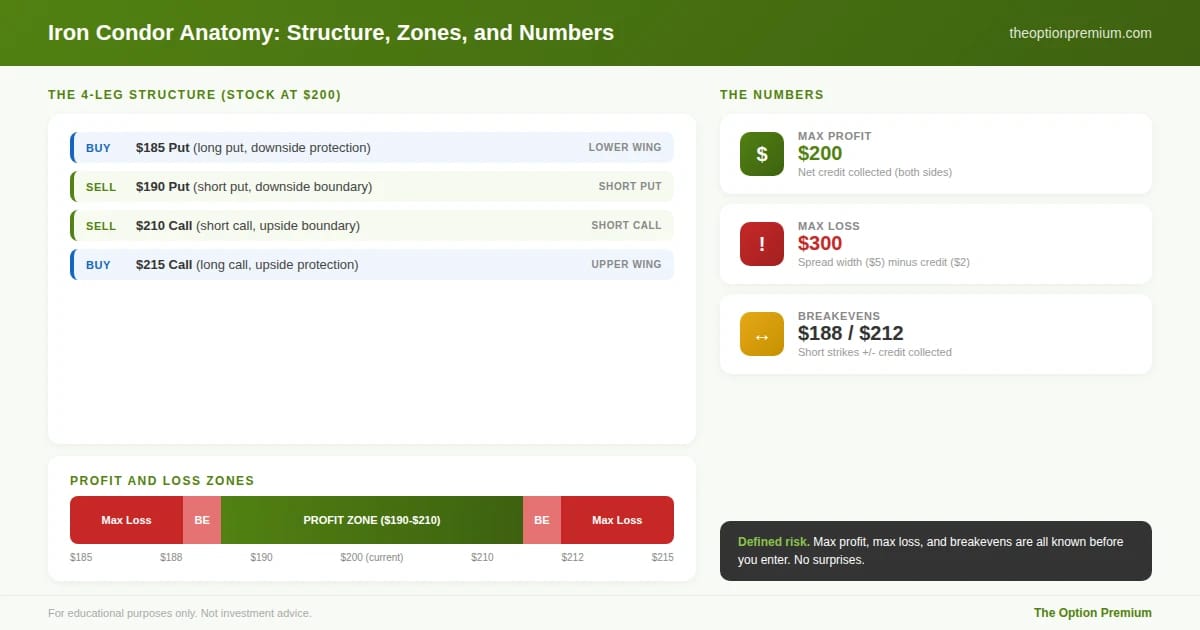
The iron condor's four-leg structure on a $200 stock: buy the $185 put, sell the $190 put, sell the $210 call, buy the $215 call for $2.00 net credit. The profit zone spans $190 to $210. Max profit is $200 (full credit). Max loss is $300 per side (spread width minus credit). All numbers known before entry.
When to Use an Iron Condor
Iron condors work best in specific market conditions. Using them at the wrong time is the fastest way to turn a high-probability strategy into a losing one.
Neutral to range-bound outlook. The stock should have no clear directional catalyst on the horizon. Iron condors are not the strategy for stocks approaching earnings, FDA decisions, or major macro events. You want boring. You want sideways.
Elevated implied volatility. Iron condors are premium-selling strategies, which means they benefit from selling overpriced options. When IV Rank is above 30, the credit you collect is larger relative to the risk you're taking. When IVR is below 20, the premiums are often too thin to justify the trade.
Sufficient time for theta to work. The 30-45 DTE window gives you the most efficient theta decay while leaving enough time to manage the position if the stock starts moving toward one of your short strikes.
High-liquidity underlyings. Tight bid-ask spreads on all four legs matter more with iron condors than with single-leg trades. You're entering and exiting four options simultaneously. Wide spreads on any leg can turn a profitable setup into a marginal one through slippage alone. ETFs like SPY, QQQ, and IWM are ideal. Large-cap stocks with deep options markets work well too.

All four conditions should be present before entering an iron condor: neutral outlook (no earnings or catalysts), elevated IV (IVR above 30), 30-45 DTE (peak theta efficiency), and high liquidity (tight spreads on all four legs). Avoid earnings, strong trends, and low-IV environments.
Selecting Your Strikes: Building the Range
Strike selection determines your probability of profit, premium collected, and risk profile. Here's the framework I use.
Short strikes by delta, not by price. I target 0.15 to 0.20 delta on both the short put and short call. This gives each side roughly an 80-85% probability of expiring OTM. Combined, the probability that the stock stays inside both short strikes is typically 65-75%.
Wing width determines risk. The distance between your short and long options on each side (the "wings") defines your maximum loss. Wider wings collect slightly more credit but increase your maximum loss proportionally. I typically use $5 wide spreads on stocks under $200 and $10 wide spreads on stocks above $200.
Symmetry is optional. The textbook iron condor has equal width on both sides, but there's no rule requiring it. If you have a slight bullish lean, you can place the put spread further OTM (lower delta) and the call spread slightly closer (higher delta). Just be aware that this shifts your probability profile.
Keep the credit-to-width ratio above 1/3. If your spreads are $5 wide, aim to collect at least $1.65 in total credit. This means your maximum loss ($3.35) is roughly twice your maximum gain, which is a reasonable risk/reward for a trade with a 65-75% probability of full profit. If you can't collect at least 1/3 of the spread width, the IV environment probably isn't rich enough for the trade.
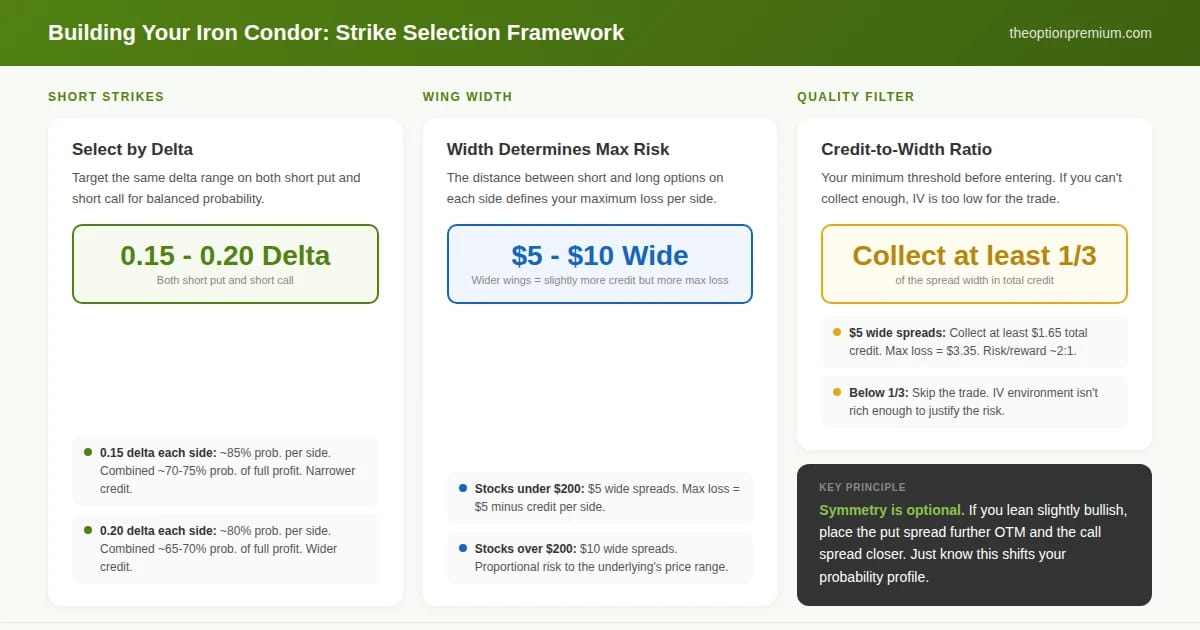
Three components of iron condor strike selection: target 0.15-0.20 delta on both short strikes (65-75% combined probability of full profit), $5 wide wings under $200 stocks and $10 wide above $200, and always collect at least 1/3 of the spread width in total credit. Below 1/3, IV is too low for the trade.
Managing the Iron Condor
Iron condors require active management. Set-and-forget is not a strategy. It's how you turn winners into losers.
Profit target: close at 50% of max profit. If you collected $2.00, close the entire position when you can buy it back for $1.00 or less. This might happen in 10-15 days if the stock stays centered. Holding for the last 50% of profit ties up capital and exposes you to gamma risk as expiration approaches.
The tested side. When the stock moves significantly toward one of your short strikes, that side is being "tested." A tested put spread means the stock is dropping toward your short put. A tested call spread means the stock is rallying toward your short call. This is where management decisions happen.
Rolling the tested side. If one side is tested, you can roll the untested side closer to collect additional credit. For example, if the stock drops toward your $190 short put, you might roll your $210/$215 call spread down to $205/$210 for an additional $0.30-$0.50 in credit. This reduces your breakeven on the tested side but narrows your profit zone. Only do this if you believe the move is temporary, not the start of a sustained trend.
Closing a tested side for a loss and keeping the winner. Sometimes the cleanest management is to close the losing side and let the winning side expire worthless. If your put spread is deeply tested, you can close it for a loss while the call spread retains nearly all its value. The net result is often a smaller loss than holding both sides to expiration.
When to take the full loss. If the stock blows through your short strike and approaches your long strike, close the entire position. Hoping for a reversal near max loss is not management. It's gambling. The defined-risk structure means your loss is capped, but there's no reason to realize the full maximum loss when you can exit for less.
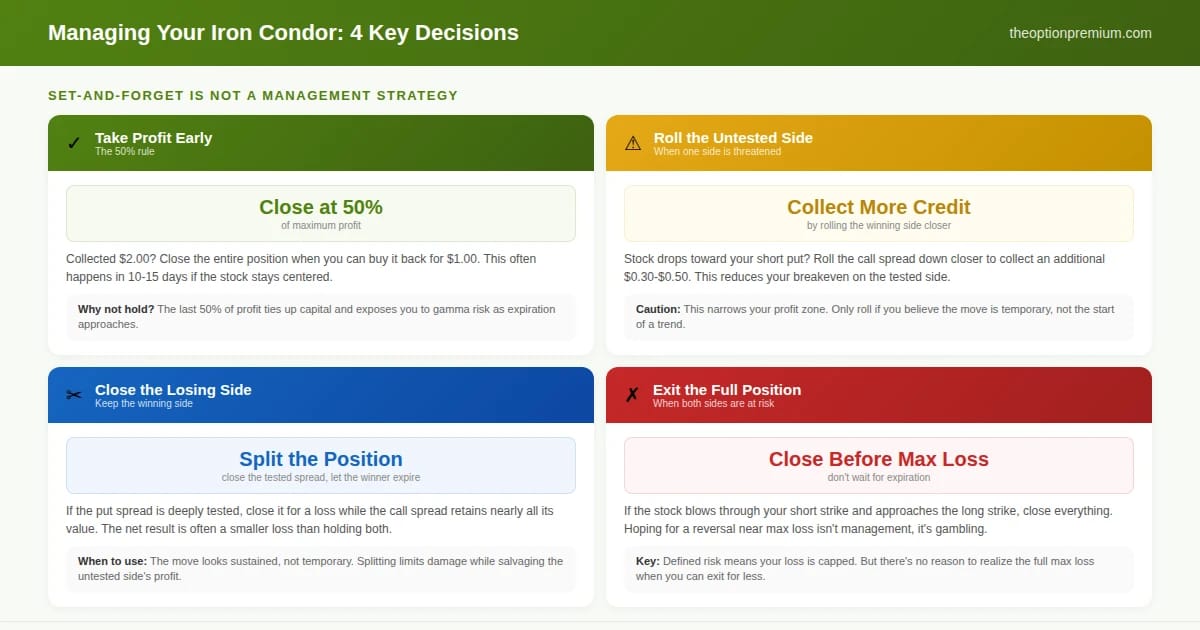
Four management decisions for every iron condor. Take profit at 50% (don't hold for the last half). Roll the untested side closer when one side is threatened (only if the move looks temporary). Close the losing side and let the winner expire (when the move looks sustained). Exit everything before max loss (hoping for a reversal is gambling, not managing).
The Practitioner Edge: Iron Condors in a Portfolio
Iron condors work best as one component of a diversified premium-selling portfolio, not as a standalone strategy. Here's how I integrate them.
ETF iron condors as a base. I run iron condors on broad ETFs like SPY for consistent, diversified exposure. The deep liquidity, tight spreads, and lack of single-stock event risk make ETFs ideal iron condor candidates. These are my "set the range and collect" positions.
Pair with directional strategies. If my portfolio has a bullish lean from cash-secured puts and Wheel positions, an iron condor adds a neutral component that performs differently. When directional trades suffer during a choppy, sideways market, the iron condor thrives.
Position sizing: risk the max loss, not the credit. This is where newer iron condor traders get into trouble. They see a $200 credit and think that's their exposure. It isn't. Your exposure is the $300 maximum loss (per the example above). Size the position so that the maximum loss on any single iron condor represents no more than 3-5% of your total account.
Diversify across underlyings and expirations. Don't run five iron condors on five tech stocks with the same expiration. A sector rotation will test all five simultaneously. Spread across sectors and stagger expirations to avoid correlated losses.
Iron Condor vs. Other Neutral Strategies
The iron condor isn't the only neutral strategy available. Understanding how it compares helps you choose the right tool.
Iron condor vs. short strangle. A short strangle (selling a naked put and naked call) collects more premium but has undefined risk on both sides. The iron condor sacrifices some premium for defined maximum loss. For most retail accounts, the defined-risk iron condor is the more appropriate choice.
Iron condor vs. iron butterfly. An iron butterfly sells the ATM put and ATM call with protective wings. It collects more premium than an iron condor but has a much narrower profit zone (essentially the stock must stay very close to the current price). Iron condors trade lower premium for a wider profit zone.
Iron condor vs. single credit spread. A single credit spread is directional (bullish or bearish). The iron condor is two credit spreads combined into a neutral position. If you have a directional opinion, use a single spread. If you expect range-bound action, the iron condor collects premium from both sides.
Risk Reality Check
Iron condors are high-probability trades, but probability is not certainty. The risks are specific and worth understanding.
Gap risk. A stock that gaps through your short strike overnight, whether from earnings, news, or a broader market shock, can move from a small loss to a near-maximum loss instantly. This is why I avoid iron condors over earnings and prefer high-liquidity underlyings where gaps are smaller in percentage terms.
Whipsaw risk. A stock that bounces between your two short strikes, testing one side then the other, can create a situation where you take losses managing both sides. Sideways with occasional spikes is the worst environment for iron condors, more so than a sustained move in one direction.
The illusion of small losses. A $300 max loss sounds manageable. But ten iron condors at $300 max loss each is $3,000 of exposure. Size based on the aggregate risk, not the individual trade.
Your defense against all three: trade high-liquidity underlyings, avoid event risk, manage actively (close at 50% profit), size conservatively (3-5% max loss per position), and diversify across sectors and expirations.
Key Takeaway
An iron condor combines a bull put spread and bear call spread to create a defined-risk neutral strategy. You profit when the stock stays within a range, collecting premium from both sides.
Maximum profit is the net credit collected. Maximum loss is the spread width minus the credit. Both are known before you enter the trade.
Use iron condors when the outlook is neutral, IV Rank is above 30, and the underlying is liquid. Target 0.15-0.20 delta short strikes and 30-45 DTE for optimal probability and theta decay.
Manage actively: close at 50% of max profit, roll the untested side when one side is tested, and exit losing positions before max loss. Set-and-forget is not a management strategy.
Size based on maximum loss, not credit collected. No single iron condor should risk more than 3-5% of your account. Diversify across underlyings and expirations to avoid correlated losses.
Define the range. Collect the premium. Manage the trade. That's the iron condor in three steps.
Andy Crowder
📩 Want to see how a 24+ year professional options trader approaches the market?
Subscribe to The Option Premium, my free weekly newsletter where I share:
Probability-based strategies that actually work: credit spreads, cash-secured puts, the wheel, LEAPS, poor man's covered calls, and more
Real trade breakdowns with the math behind every decision
Market insights for any environment, whether we're grinding higher, pulling back, or chopping sideways
No hype. No predictions. Just the frameworks I've used to trade options for over two decades.
📺 Want more? Follow me on YouTube for in-depth tutorials, live trade analysis, and the kind of education you won't find anywhere else.
Connect with me:
This newsletter is for educational purposes only and should not be considered investment advice. Options trading involves significant risk and is not suitable for all investors. Past performance does not guarantee future results. Always consult with a qualified financial professional before making investment decisions.
Reply