- The Option Premium
- Posts
- How to Size Credit Spread Positions: Max Loss, Account Risk, and the 2% Rule
How to Size Credit Spread Positions: Max Loss, Account Risk, and the 2% Rule
The exact 5-step formula for sizing credit spreads by max loss. Covers the 2% rule, 3-5% for experienced traders, spread width comparisons, and the 20-25% aggregate portfolio cap.

Andrew Crowder
March 28, 2026

How to Size Credit Spread Positions: Max Loss, Account Risk, and the 2% Rule
Position sizing is the most important skill in options trading that nobody wants to talk about. It's not exciting. There's no chart to analyze. No pattern to spot. But it's the single variable that determines whether a losing streak is a minor setback or a portfolio-ending event.
You can have the best delta selection, the perfect IV Percentile filter, and a return on capital that clears every threshold. None of it matters if you're risking 15% of your account on each trade. Three losses in a row and you've destroyed 45% of your capital. The math of recovery from that point is brutal: you need a 82% return just to get back to even.
This guide covers the exact formulas, the account-level rules, and the framework I use to size every credit spread I trade.
The Foundation: Max Loss Is Your Sizing Unit
The first rule of credit spread position sizing is that you size by max loss, never by premium collected or number of contracts.
Your max loss on a credit spread is the spread width minus the net credit, times 100 per contract. On a $5 wide spread with a $1.50 credit, your max loss is $3.50 per share, or $350 per contract. That $350 is the number that drives every sizing decision.
Why max loss and not premium? Because premium is what you hope to make. Max loss is what you're actually risking. Two traders might both collect $150 in premium, but if one is on a $5 wide spread (max loss $350) and the other is on a $10 wide spread (max loss $850), they have very different risk profiles despite identical income. Sizing by premium makes them look the same. Sizing by max loss reveals the truth.
Why max loss and not buying power reduction? Different brokers calculate margin differently. Some show the spread width as capital required, others net the credit against it. Max loss is the universal number that doesn't change based on your broker's display. It's the worst-case dollar outcome, and it's what you build your position around.
The 2% Rule for Credit Spreads
The 2% rule, adapted from stock trading to options, states that no single trade should risk more than 2% of your total account value. For a $50,000 account, that's $1,000 maximum loss per position. For a $100,000 account, $2,000.
The formula:
Max contracts = (Account size x 2%) / Max loss per contract
$50,000 account, $5 wide spread, $1.50 credit: Max loss per contract: $350 Max contracts: ($50,000 x 0.02) / $350 = 2.86, rounded down to 2 contracts Total max risk: $700 (1.4% of account)
$100,000 account, same spread: Max contracts: ($100,000 x 0.02) / $350 = 5.71, rounded down to 5 contracts Total max risk: $1,750 (1.75% of account)
Always round down. If the math says 2.86 contracts, you trade 2, not 3. Rounding up violates the rule. It seems like a small difference ($350 more risk), but across a portfolio of 5-8 positions, rounding up on each one can push total risk well beyond your limits.
The 2% Rule vs. the 5% Rule: Which Is Right for You?
The 2% rule is conservative. Many experienced premium sellers use a 3-5% per-position limit. Neither is wrong. The right limit depends on your situation.
Use 2% when: You're in your first year of credit spread trading. Your account is under $25,000 (smaller accounts can't afford large drawdowns). You're running 6-8+ simultaneous positions (aggregate risk adds up fast). Or you're in a high-volatility environment where the probability of multiple positions losing simultaneously is elevated.
Use 3-5% when: You have 2+ years of consistent track record. Your account is above $50,000. You're running 3-5 positions with diversification across sectors. And you're in a moderate-volatility environment with normal market breadth.
The aggregate constraint matters more than the individual limit. Whether you use 2% or 5% per position, your total portfolio risk across all open positions should never exceed 20-25% of your account. On a $100,000 account, that means no more than $20,000-$25,000 in total max loss across all positions combined. This is the rule that prevents a correlated selloff from devastating your account.
Here's how it works in practice. If you use 3% per position on a $100,000 account ($3,000 max loss per trade), you can run roughly 7 positions before hitting the 20% aggregate cap ($21,000). If you use 5% per position ($5,000 max loss per trade), you can run only 4 positions before hitting the same cap ($20,000). Higher per-position risk means fewer simultaneous positions.
The Position Sizing Formula: Step by Step
Here's the complete process I use before every trade entry.
Step 1: Calculate max loss per contract. Spread width minus net credit, times 100. Example: $5 wide spread, $1.40 credit. Max loss = ($5.00 - $1.40) x 100 = $360 per contract.
Step 2: Determine your per-position risk limit. Account size times your risk percentage (2%, 3%, or 5%). Example: $75,000 account at 3% = $2,250 maximum loss on this position.
Step 3: Calculate maximum contracts. Per-position risk limit divided by max loss per contract, rounded down. Example: $2,250 / $360 = 6.25, rounded down to 6 contracts.
Step 4: Check total max risk. Max contracts times max loss per contract. Example: 6 x $360 = $2,160 total risk on this position (2.88% of account). Under the 3% limit. Good.
Step 5: Check aggregate portfolio risk. Add this position's max loss to all other open positions' max losses. Example: You already have 4 positions totaling $9,500 in max loss. Adding $2,160 brings total to $11,660 (15.5% of $75,000). Under the 20-25% aggregate cap. Proceed.
If Step 5 would push you over the aggregate limit, reduce contracts on this trade or skip it entirely. The aggregate cap always wins.
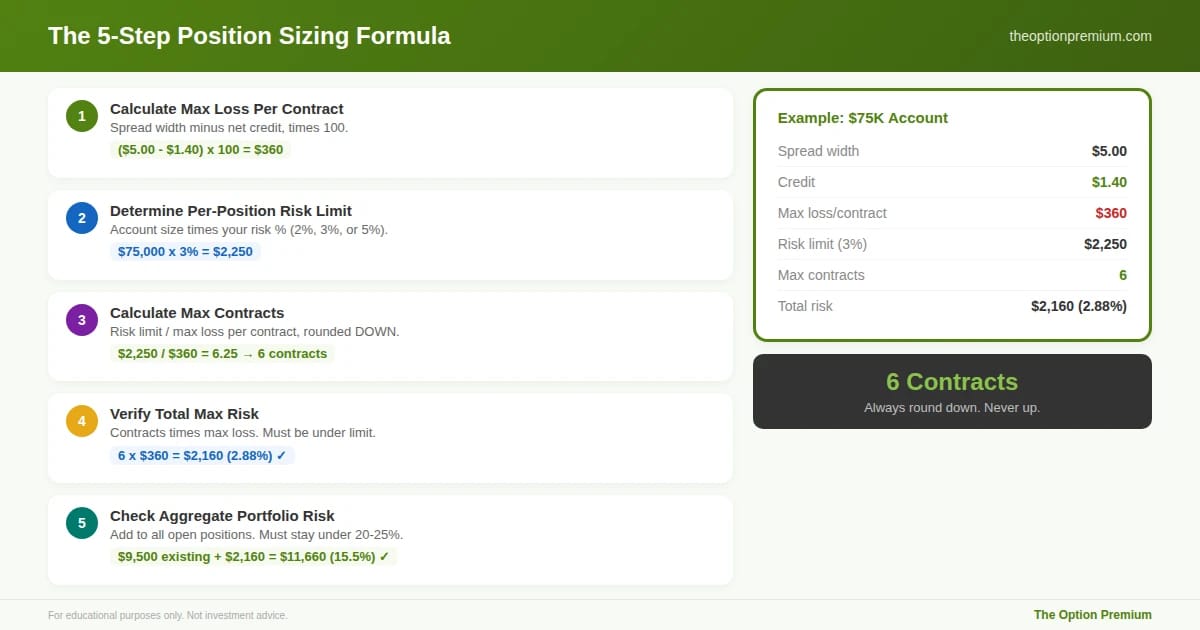
The complete 5-step formula applied to a $75,000 account. Step 1: max loss per contract is $360 ($5 wide minus $1.40 credit). Step 2: 3% risk limit gives a $2,250 budget. Step 3: $2,250 divided by $360 = 6.25, rounded down to 6 contracts. Step 4: total risk is $2,160, or 2.88% of account. Step 5: adding to existing positions keeps aggregate at 15.5%, well under the 20% cap. Always round down. The aggregate check in Step 5 is the one that catches over-deployment.
Why Most Traders Oversize (and What Happens)
Position sizing feels limiting. You run the numbers and the formula says 2 contracts. But you wanted to trade 5. The premium on 5 contracts is $750 instead of $300. That's the seduction.
Here's what happens when you oversize.
The math of consecutive losses. At 0.20 delta, you have roughly an 80% win rate. Over 50 trades, you'll have 10 losses. Those losses don't arrive evenly. You will experience a streak of 3 consecutive losses. The probability of 3 in a row is roughly 0.8% on any given 3-trade sequence, but over 50 trades, the probability of experiencing at least one 3-loss streak is over 40%.
At 2% risk per trade, 3 consecutive losses cost 6% of your account. Uncomfortable but manageable. At 5% risk, 3 losses cost 15%. Painful. At 10% risk, 3 losses cost 30%. Career-threatening. At 15% risk, 3 losses cost 45%. A 45% drawdown requires an 82% gain to recover.
The formula doesn't protect you from losing. It protects you from losing so much that recovery becomes improbable.
The mental capital effect. Oversized positions create emotional responses that degrade decision quality. A $350 unrealized loss on 2 contracts ($700) is manageable. The same $350 per-contract loss on 8 contracts ($2,800) creates panic. Panic leads to early exits, revenge trading, and strategy abandonment. The right position size is the one where a maximum loss is boring, not terrifying.

At 0.20 delta (80% win rate), a 3-loss streak has a 40%+ probability of occurring over 50 trades. At 2% risk per trade, three consecutive losses cost 6% of your account, requiring a 6.4% return to recover. At 15% per trade, three losses destroy 45%, requiring an 81.8% gain just to get back to even. The formula doesn't protect you from losing. It protects you from losing so much that recovery becomes improbable.
Sizing for Different Spread Widths
Spread width changes the math significantly. Here's a comparison on a $50,000 account at 3% risk ($1,500 max loss budget).
$2.50 wide spread, $0.85 credit. Max loss per contract: $165. Contracts: 9. Total max risk: $1,485. Total potential profit: $765.
$5 wide spread, $1.50 credit. Max loss per contract: $350. Contracts: 4. Total max risk: $1,400. Total potential profit: $600.
$10 wide spread, $2.20 credit. Max loss per contract: $780. Contracts: 1. Total max risk: $780. Total potential profit: $220.
Notice: the $2.50 wide spread generates the most potential profit ($765) on similar risk because the ROC is highest on narrow spreads. The $10 wide spread generates the least ($220) because it uses the risk budget least efficiently. But the $10 wide spread is the simplest to manage (1 contract vs. 9).
This is why spread width and position sizing are connected decisions, not independent ones. Choose your width first, then size the position. Don't size the position first and then pick whatever width gets you the most contracts.
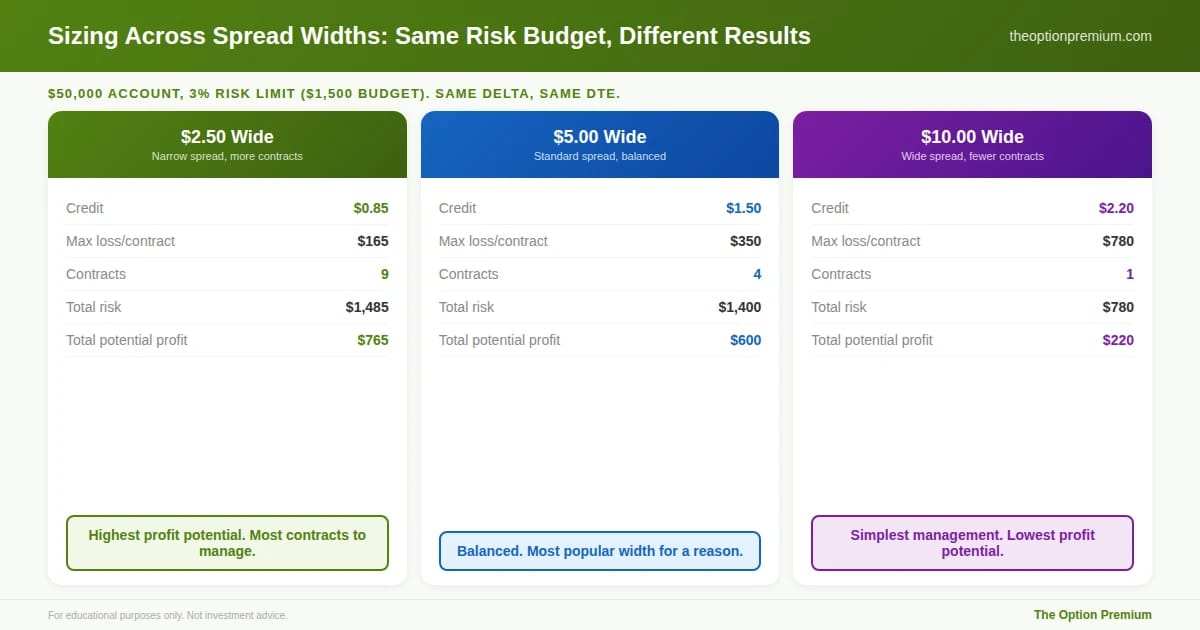
Same risk budget ($1,500 on a $50K account), dramatically different outcomes. The $2.50 wide spread generates the most potential profit ($765) because it allows 9 contracts with the highest ROC per contract. The $5 wide spread is the balanced choice at 4 contracts and $600 potential. The $10 wide spread allows only 1 contract and $220 in potential profit, but it's the simplest to manage. Width and sizing are connected decisions, not independent ones. Choose width first, then size.
Portfolio-Level Sizing: The Aggregate Framework
Individual position sizing protects you from any single trade. Portfolio-level sizing protects you from correlated losses across multiple trades.
The 20-25% aggregate cap. Total max loss across all open positions should never exceed 20-25% of your account. On a $100,000 account, that's $20,000-$25,000 max exposure.
Diversification within the cap. Spreading the exposure across different sectors, different underlyings, and different expirations provides real diversification. Five credit spreads on five tech stocks isn't diversification. Five spreads on SPY, XLF, XLE, XLV, and GLD is.
Stagger expirations. If all positions expire in the same week, a single bad week tests everything simultaneously. Staggering entries so positions expire across 2-3 different weeks distributes your risk over time.
Cash reserve. Maintain at least 20% of your account in cash at all times. This isn't idle money. It's your opportunity fund. When markets sell off and premiums spike, having cash available to sell into the fear is when the best trades of the year get made. Traders who are fully deployed during selloffs miss the richest premiums.
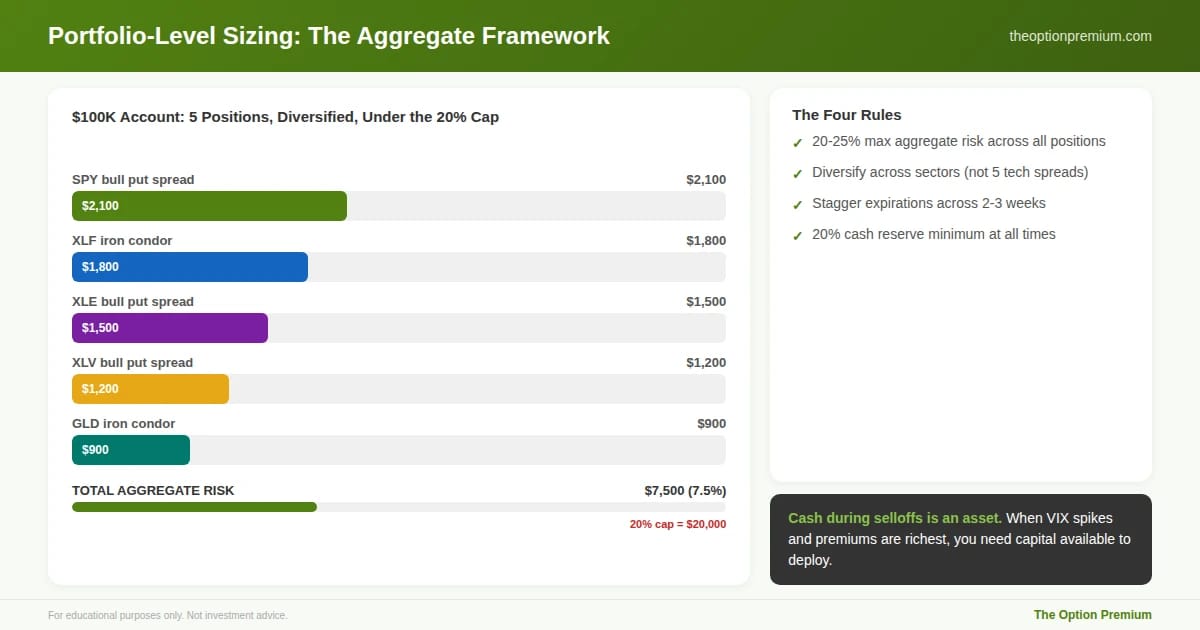
Individual position sizing protects you from any single trade. Portfolio-level sizing protects you from correlated losses. This $100K example shows 5 diversified positions (SPY, XLF, XLE, XLV, GLD) totaling $7,500 in aggregate risk, well under the 20% cap of $20,000. Four rules: aggregate risk never exceeds 20-25%, diversify across sectors (not 5 tech spreads), stagger expirations across 2-3 weeks, and maintain a 20% cash reserve. Cash during selloffs is an asset, not idle money
The Practitioner Edge: My Sizing Rules
Default: 3% per position on a $75,000+ account. This gives me 4-8 contracts on most $5 wide SPY or sector ETF spreads. On a smaller account, I'd use 2%.
Aggregate cap: 20% of account. I track total max loss across all positions in a simple spreadsheet. Before every new entry, I check whether the new position would push me past 20%. If it would, I skip the trade or wait for an existing position to close.
Reduce size in high-VIX environments. When VIX is above 28, I drop from 3% per position to 2%. Elevated volatility means the expected moves are larger, and the probability of multiple positions being tested simultaneously increases. Smaller size gives me more room to manage and more cash to deploy as conditions stabilize.
Never add to a losing position. If I'm already in a SPY put spread and it's losing, I don't sell another SPY put spread to "average down." That doubles my exposure at the worst possible time. One position per underlying at a time. If I want more exposure to a market recovery, I wait for the first position to resolve.
Risk Reality Check
Position sizing doesn't make you money. It prevents you from losing so much that you can't make money anymore. There's no glory in perfect sizing. There's no screenshot to post. But there's a portfolio that's still intact after three years, five years, ten years, when most other traders' accounts are closed.
The traders who last aren't the ones with the highest win rates or the biggest individual gains. They're the ones who sized correctly through every losing streak, every correction, and every period of doubt. The position size is the foundation. Everything else sits on top of it.
Key Takeaways

Size by max loss (spread width minus credit), never by premium collected or buying power. Max loss is the universal, worst-case dollar number that drives every sizing decision. Always round contracts down, never up.
The 2% rule: no single trade risks more than 2% of total account value. Conservative but appropriate for newer traders and smaller accounts. Experienced traders with larger accounts can use 3-5%, but the aggregate constraint (20-25% total portfolio risk) matters more than the per-position limit.
The 5-step formula: calculate max loss per contract, determine per-position risk limit, divide to get max contracts (round down), verify total max risk, and check aggregate portfolio risk against the 20-25% cap. If Step 5 fails, reduce or skip.
Spread width changes the sizing math. Narrow spreads ($2.50) allow more contracts and higher potential profit on similar total risk. Wide spreads ($10) allow fewer contracts with simpler management. Choose width first, then size the position.
The aggregate framework prevents correlated losses: 20-25% max total exposure, diversified across sectors and underlyings, staggered expirations, and a 20% cash reserve. Reduce per-position size in high-VIX environments. Never add to a losing position.
Position sizing is the foundation. Everything else sits on top of it.
Andy Crowder
📩 Want to see how a 24+ year professional options trader approaches the market?
Subscribe to The Option Premium, my free weekly newsletter where I share:
Probability-based strategies that actually work: credit spreads, cash-secured puts, the wheel, LEAPS, poor man's covered calls, and more
Real trade breakdowns with the math behind every decision
Market insights for any environment, whether we're grinding higher, pulling back, or chopping sideways
No hype. No predictions. Just the frameworks I've used to trade options for over two decades.
📺 Want more? Follow me on YouTube for in-depth tutorials, live trade analysis, and the kind of education you won't find anywhere else.
Connect with me:
This newsletter is for educational purposes only and should not be considered investment advice. Options trading involves significant risk and is not suitable for all investors. Past performance does not guarantee future results. Always consult with a qualified financial professional before making investment decisions.
Reply