- The Option Premium
- Posts
- How to Adjust an Iron Condor When One Side Is Tested
How to Adjust an Iron Condor When One Side Is Tested
Five iron condor adjustments for when one side gets tested: close the tested side, roll out, roll down, roll the untested side closer, or close everything. Includes decision tree and real SPY examples.

Andrew Crowder
March 28, 2026
How to Adjust an Iron Condor When One Side Is Tested
The iron condor is the premium seller's range-bound workhorse. You sell a bull put spread below the market and a bear call spread above it, collecting premium from both sides while the underlying stays within the profit zone. When it works, it's one of the most efficient income trades in options.
When it doesn't work, one side gets tested. The stock moves directionally, pushing into one of your short strikes while the other side decays harmlessly. And this is where most iron condor traders fall apart. They either panic-close the entire position (giving up the winning side) or freeze and do nothing (watching the tested side march toward max loss).
Neither is the right response. There are specific, repeatable adjustments for tested iron condors, and choosing the right one depends on how far the stock has moved, how much time is left, and whether the move is likely to continue. This guide covers all of them.
Understanding What "Tested" Means
An iron condor is "tested" when the stock price approaches or reaches one of the short strikes. There are degrees of testing, and each requires a different response.
Approaching the short strike (stock within 1-2% of the strike). The position is under pressure but not yet in trouble. The tested side is gaining value (your cost to close it is increasing) while the opposite side is decaying. No adjustment is necessary yet, but you should be evaluating your options.
At the short strike (stock has reached it). The tested spread is now at the money. Its delta has increased significantly, meaning small additional moves will cause rapid P&L changes. This is the point where adjustments should be actively considered.
Through the short strike (stock has breached it). The tested spread is in the money. If the stock has moved past the short strike by more than half the spread width, the probability of that side expiring profitable has dropped dramatically. Adjustment or closure is typically necessary.
The untested side. While one side is being tested, the other side is decaying rapidly. A $680/$685 bear call spread on SPY that you sold for $0.85 might now be worth $0.10. That $0.75 of profit on the winning side is real and affects your adjustment decisions. Never ignore the winning side when managing the losing side.
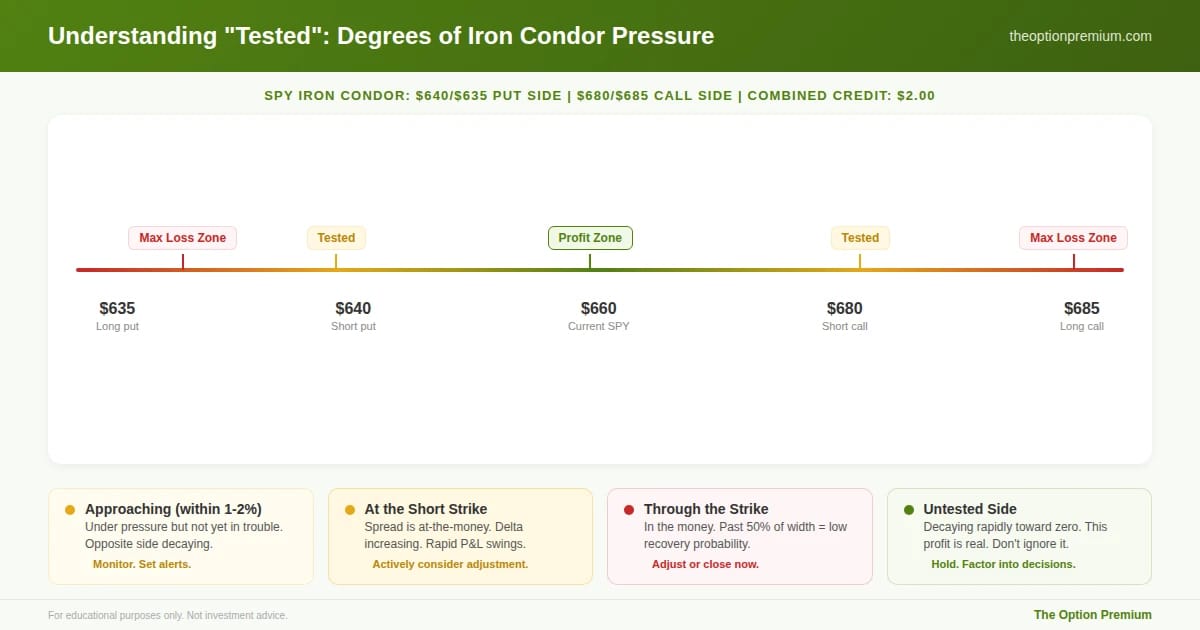
Four degrees of testing on an iron condor, each requiring a different response. Approaching the strike (within 1-2%): monitor, set alerts. At the short strike: delta is climbing, consider adjustment. Through the strike by more than half the width: recovery probability is low, adjust or close. Meanwhile, the untested side is decaying toward zero. That profit is real and should factor into every adjustment decision. Never ignore the winning side when managing the losing side.
Adjustment 1: Close the Tested Side, Keep the Winner
This is the most common and often the best iron condor adjustment. It's clean, simple, and preserves the profit on the untested side.
How it works. You sold an iron condor on SPY for $2.00 combined credit ($1.10 on the put side, $0.90 on the call side). SPY drops and the put side is now worth $2.80 while the call side is worth $0.12. Close only the put spread for $2.80. Let the call spread continue decaying.
The math. Loss on the put side: $2.80 cost to close minus $1.10 credit = $1.70 loss. Remaining profit on the call side: $0.90 credit minus $0.12 cost to close eventually (or $0.00 if it expires worthless) = $0.78-$0.90 profit. Net result: approximately $0.80-$0.92 loss instead of $1.70.
When to use it: The move is directional and likely to continue (strong ADX, clear trend). The untested side has meaningful premium remaining. You want to reduce risk immediately without giving up confirmed profit.
When to avoid it: Both sides are being tested (whipsaw market). The untested side has already decayed to near-zero (holding it adds almost nothing). Or you believe the stock is about to reverse and want to keep the full structure.

The default iron condor adjustment in action. SPY drops to $643, testing the put side. The $640/$635 put spread (sold for $1.10) is now worth $2.80, a $1.70 loss. The $680/$685 call spread (sold for $0.90) is worth $0.12, a $0.78 profit. Close only the put side. Let the call side decay to near-zero. Net result: -$0.80 to -$0.92 instead of -$1.70. The winning side reduces the net loss by 46-54%. This is why you never panic-close both sides.
Adjustment 2: Roll the Tested Side Out in Time
Close the losing spread and reopen the same strikes at a later expiration. This is the same rolling technique used on standalone credit spreads, applied to one side of the condor.
How it works. Your put side ($640/$635) is being tested. Close it for $2.60. Reopen the $640/$635 at 45 DTE for $3.10. Net credit on the roll: $0.50. Your call side ($680/$685) remains unchanged and continues decaying.
Post-roll position. You now have an "unbalanced" iron condor: a put spread at 45 DTE and a call spread at your original expiration (probably 14-21 DTE remaining). This is fine. The two sides don't need to expire on the same date. The call side will close out or expire on its own, and the rolled put side gets a fresh 45 days to recover.
When to use it: The stock hasn't breached your short strike by more than 50% of the spread width. You can roll for a net credit. The thesis (range-bound expectation) is intact, and the move may be temporary.
Critical rule: Only roll for a net credit. If the cost to close exceeds what you can collect on the new spread, close the tested side outright instead.
Adjustment 3: Roll the Tested Side Down (or Up) and Out
Close the losing spread and reopen at a later expiration with the short strike moved further from the current stock price. This buys time AND improves your probability on the new position.
How it works. Your put side ($640/$635) is tested with SPY at $641. Close it for $3.00. Open the $635/$630 at 45 DTE for $3.15. Net credit: $0.15. Your short put moves from $640 to $635, giving you $5 more cushion from the current stock price. The call side remains untouched.
The trade-off: Moving the strikes down collects a smaller net credit than a straight roll out. But the improved probability is often worth the trade-off. After the roll, your short put is $6 below SPY (at $635 vs. $641) instead of $1 below it (at $640 vs. $641). That's a dramatically better position.
When to use it: The stock has reached or slightly breached your short strike. A straight roll out would leave the short strike too close to the stock price (delta above 0.35). You want meaningful repositioning, not just more time.
Adjustment 4: Roll Up the Untested Side (Collecting Additional Credit)
Instead of adjusting the tested side, bring the profitable side closer to the stock to collect additional premium. This doesn't fix the losing side, but it reduces the overall loss on the position by increasing total credit collected.
How it works. SPY drops to $643. Your put spread ($640/$635) is threatened. Your call spread ($680/$685), sold for $0.90, is now worth $0.05. Buy back the call spread for $0.05 and resell it closer to the current stock price: sell the $660/$665 bear call spread for $0.80.
The math. You closed the original call spread for $0.05 (pocketing $0.85 of the $0.90 credit). You collected $0.80 on the new call spread. Total additional credit from the call side: $0.85 + $0.80 = $1.65 (vs. the original $0.90). This extra credit reduces your breakeven on the put side.
The risk: You've moved the call spread closer to the stock. If SPY reverses sharply upward, the new call spread could be tested. You've gone from a "one side tested" problem to a potential "both sides tested" problem. This adjustment only makes sense when you believe the directional move is likely to continue, making the closer call spread still safe.
When to use it: The move is strong and sustained (high ADX, momentum confirmed). The original untested side has almost fully decayed (little additional profit to capture by holding). You want to reduce the net loss without extending your time commitment on the tested side.
Adjustment 5: Close the Entire Position
Sometimes the best adjustment is no adjustment at all. Close the whole thing, book the result, and move on.
When to close everything: The stock has blown through your short strike by more than half the spread width. You've already adjusted once and the position is still deteriorating. The unrealized loss on the tested side exceeds the maximum loss you planned for when you entered. Or market conditions have shifted fundamentally (breadth collapse, VIX spike above 35) and holding any positions feels like fighting the tide.
The math on a full close. You sold the iron condor for $2.00 combined. The put side is now worth $3.50. The call side is worth $0.08. Total cost to close both: $3.58. Net loss: $1.58. Max loss on the put side alone would have been $3.00 ($5 spread minus $2.00 total credit). By closing early, you've avoided an additional $1.42 of potential loss.
The redeployment advantage. The capital freed from closing the losing iron condor is immediately available for a new trade. If IV has expanded during the selloff (which it usually does), the next iron condor or credit spread you sell will collect richer premiums. The capital is often better deployed in a fresh position than locked into a deteriorating one.
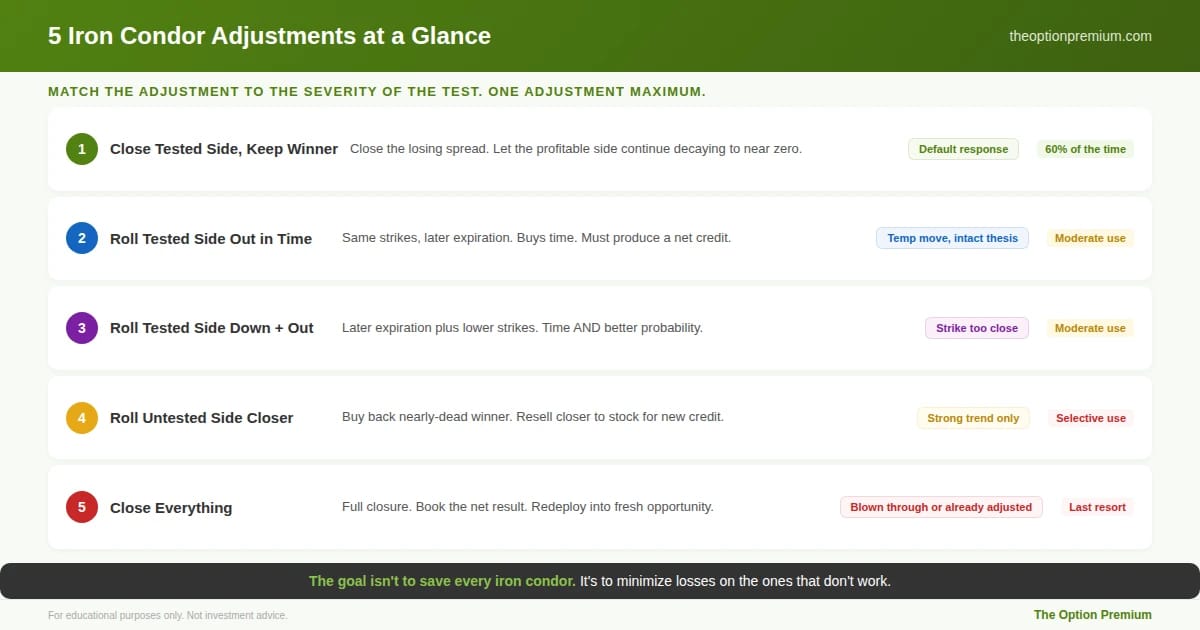
Five adjustments, each for a different scenario. The default (used 60% of the time): close the tested side, let the winner keep decaying. Roll out in time when the move seems temporary and you can get a net credit. Roll down and out when the short strike is too close after reaching the stock price. Roll the untested side closer only in strong, sustained trends (ADX above 25). Close everything when the stock has blown through or you've already adjusted once. One adjustment maximum per iron condor.
The Decision Tree for Iron Condor Adjustments
Is the stock approaching but hasn't reached the short strike? Monitor. No adjustment yet. Set alerts at the short strike.
Has the stock reached the short strike, and is the untested side still valuable? Close the tested side, keep the winner (Adjustment 1). This is the default first response.
Is the stock at the short strike and you believe it will recover? Roll the tested side out in time (Adjustment 2) if you can do it for a net credit.
Has the stock breached the short strike by a small amount? Roll out and down/up (Adjustment 3) for better positioning.
Is the move strong and sustained, with the untested side nearly fully decayed? Roll up the untested side (Adjustment 4) to collect additional credit and reduce net loss.
Has the stock blown through the short strike, or have you already adjusted? Close everything (Adjustment 5). Redeploy into a fresh position.
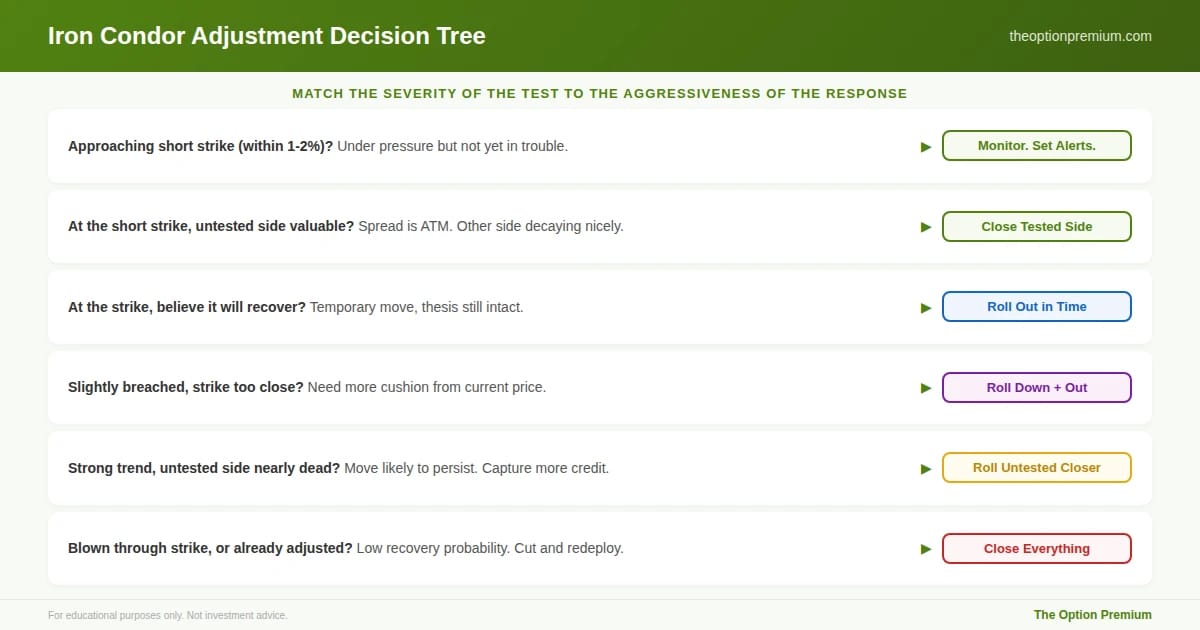
Match the severity of the test to the aggressiveness of the response. The tree escalates from monitoring (approaching) through closing the tested side (at the strike) to rolling (slightly breached) and finally full closure (blown through or already adjusted). The key insight: most tested iron condors need only the simplest adjustment. Closing the tested side while keeping the winner handles 60% of scenarios.
The Practitioner Edge: My Iron Condor Adjustment Rules
Default response: close the tested side. It's the simplest, cleanest adjustment with the least room for error. I use this on roughly 60% of my tested iron condors.
Roll only for a net credit, and only once. If I roll the tested side and it's still deteriorating two weeks later, I close the whole position. No second rolls on the same iron condor.
Never roll the untested side closer unless ADX is above 25. Moving the winning side closer to the stock is only safe when the directional move has real conviction behind it. In choppy, low-ADX markets, the risk of a reversal testing the newly-positioned side is too high.
Track the "total credit" across all adjustments. Every credit collected on any leg of the iron condor, from original entry through all adjustments, gets summed. My exit target on the adjusted position is still 50% of total credit collected. This keeps me consistent even as the position structure changes.
Position sizing check after every adjustment. After rolling or restructuring, I recalculate my max loss on the adjusted position. If it exceeds my per-position risk limit (3-5% of account), I reduce contracts.
Risk Reality Check
The biggest risk with iron condor adjustments isn't any single adjustment. It's over-managing. An iron condor that gets adjusted three times across both sides over four weeks has become a sprawling, complex position that's difficult to track, expensive to close, and probably would have been better off closed after the first adjustment.
Simplicity is the edge. One adjustment, clearly chosen from the five options, executed cleanly. If the adjusted position works, close it at the profit target. If it doesn't work, close the whole thing and redeploy. The goal isn't to save every iron condor. It's to minimize the loss on the ones that don't work so your winners more than compensate.
Key Takeaways
An iron condor is "tested" when the stock approaches, reaches, or breaches one of the short strikes. The degree of testing determines the appropriate response. Always account for the untested side's remaining premium in your decision.
Five adjustment options: close the tested side and keep the winner (default, simplest, used 60% of the time), roll the tested side out in time (net credit required), roll out and down for better positioning (when the short strike is too close), roll the untested side closer to collect additional credit (strong trend only), or close everything and redeploy.
The decision tree starts with monitoring (approaching the strike), escalates to closing the tested side (at the strike), progresses to rolling (slightly breached), and ends with full closure (blown through or already adjusted). Match the severity of the test to the aggressiveness of the response.
One adjustment maximum per iron condor. Roll only for a net credit. Never move the untested side closer in low-ADX (choppy) markets. Track total credit across all adjustments and target 50% of total credit as your exit.
Over-managing is the biggest risk. An iron condor adjusted three times is too complex, too expensive, and almost always would have been better off closed after the first adjustment. Simplicity is the edge.
The goal isn't to save every iron condor. It's to minimize losses on the ones that don't work, so the ones that do work define your results.
Andy Crowder
📩 Want to see how a 24+ year professional options trader approaches the market?
Subscribe to The Option Premium, my free weekly newsletter where I share:
Probability-based strategies that actually work: credit spreads, cash-secured puts, the wheel, LEAPS, poor man's covered calls, and more
Real trade breakdowns with the math behind every decision
Market insights for any environment, whether we're grinding higher, pulling back, or chopping sideways
No hype. No predictions. Just the frameworks I've used to trade options for over two decades.
📺 Want more? Follow me on YouTube for in-depth tutorials, live trade analysis, and the kind of education you won't find anywhere else.
Connect with me:
This newsletter is for educational purposes only and should not be considered investment advice. Options trading involves significant risk and is not suitable for all investors. Past performance does not guarantee future results. Always consult with a qualified financial professional before making investment decisions.
Reply